My wife, Cathy, is the true artist in the family, having created hundreds of artistic works in her lifetime, mostly paintings and drawings and a number of amazing murals. This story begins in the summer of 1992 with one of her first murals, a beach scene in our sons' bedroom. Two of our teenage sons shared a large bedroom and the older one wanted to have the perfect wave painted on one wall. He loved and still does love surfing, as do his wife and kids. He makes use of his family's vacation times for them to all travel the world exploring the great beaches, looking for the best waves.
Anyway, my wife took on the challenge and painted a tropical scene with sandy beaches and palm trees and a wave - a vision of my son's perfect wave - breaking near the shore. The seascape took up the entire south wall, clear to the peak of the raised ceiling and wrapped around the corners onto the adjacent walls. It was truly a work of art and a labor of love.
So, jump ahead to 2004 and both of those boys have moved out and are married as are most of our other kids. We now call the bedroom "The Beach Room" as the mural has endured all those years and is a centerpiece of art within our home. When new friends come to our home it is one of the first things that we share with them while touring the house. In fact it is still there today (2022) so has held this prominent spot for almost 30 years.
Each of Us has Something Great within Us
Just Waiting to be Released
In God's Perfect Timing
My wife now (in 2004) wants to decorate the room with a "seafaring" theme, adding items unbefitting a teenager's room such as seagull figures and seashells and - a porthole. So, it is at this point that I come into the picture. I enjoy looking for eclectic artifacts on eBay (an online shopping network much like an internet garage sale), where people sell their stuff they no longer want or need.
So, I volunteered to find a porthole to decorate the wall.
I began my search for the perfect porthole and, much to my dismay, the portholes I found were painted over or rusted or broken or with only a part of the porthole remaining. But finally, I found one that looked complete and in good shape, with only minor paint around the bolt holes. It said it was 27 inches in diameter and weighed 100 pounds but in my excitement, I really didn't notice. I thought it would be perfect for "The Beach Room" so I bid on it and WON!
Now I don't remember but, most likely I did all of this without asking my wife for her thoughts on my choice of a porthole. When my wife saw it, she said no, that it was too big and too heavy. She wanted a much smaller porthole, maybe 12 inches in diameter, with a mirror inside that could be hung on the wall above a beached themed shelf holding beach related bric-a-brac.
So now (April 2004), since I won it, I had to buy it. It was shipped to our home on a wooden pallet and I said I thought it was cool and that I would do something with it at some later date, like maybe make a porthole table out of it. I had seen porthole tables while browsing eBay and they were generally not much to look at but it was all I could think of at the moment. Little did I know what it would take to get the job done!

I stuck the porthole on a lower shelf in the garage with big plans but no time. So, there it lay hidden, for years and years, with me pulling it out every now and again to think about building something with it. At one point I went back on eBay looking for something to use as table legs and found some 4-foot-long brass poles, the kind used on circus carousels to make the horses go up and down. I bought them and tried to work out a design for the table but to no avail. I think the poles are buried in my garage, most likely only to be resurrected by my kids after I am gone.
Every now and then I would mention the porthole to my family, saying I was going to make a table out of it. It became the big joke as I was all talk but little to no action.
So, moving on, I retired in 2015 and started to settle in to my new life. My wife and I had plans to fix up our home and I worked on a number of remodel type projects around the house as well as spent more time with my kids and grandkids. Between these projects, my grandkids and my naps, it kept me busy most of the time. I would think about the porthole and had different ideas running through my head but didn't do any real work on it until COVID. It's not that COVID really prompted me to do it, it was just the timing as things slowed down at home, and I needed to clean out my garage (still a project to finish by the way). I went looking for a project and decided that it was time to really focus on the porthole and what to do about it.

I started my research by scanning any websites I could find that sold nautical pieces. I wanted to know as much as I could about my porthole. At some time in the past I had connected to a company that would get boatloads of nautical wares from India or China or elsewhere in the South Pacific and then offer them for sale. I saw more tables but no portholes of the size and condition of mine. I gathered information on-line about John Roby LTD, the English foundry that apparently had made the porthole. I contacted some museums in Liverpool and St Helens, and even a used nautical dealer in Maine who sent me a paragraph from the internet as his contribution.

I have yet to find a porthole even close to the size and condition of mine, nor can I determine how old mine is. I suspect, based on the little information I have about the John Roby foundry, that my porthole is possibly 100+ years old. The true answer is probably somewhere in one of the English museums, in their archives of paperwork from John Roby. Below is some history from the St Helens Star that support my thoughts.
The John Roby LTD Foundry was located in Rainhill England within the Metropolitan Borough of St Helens, in Merseyside. It is near the port city of Liverpool which is located on the River Mersey where it meets the Irish Sea. If you know any music from the 1960's, this is the same Liverpool that the Beatles called home.
John Roby was in operation from the late 1850's to 1973. Another foundry in the area during those years was Thomas Utley LTD. The Utley workbooks dated 1888 to 1903 (held by St Helens Archives), reveal that a huge amount of work was contracted to John Roby. A daybook held by the Liverpool Maritime Museum Archive similarly shows a constant flow of orders from the Utley Foundry to the Roby Foundry - all items made to Utley patterns and often to a special mixture of metals.

Thomas Utley LTD was a primary supplier of metal fittings for the Titanic. Unfortunately, their surviving workbooks do not cover the period when the Titanic was built (the Titanic was built at the Harland and Wolff shipyard in Belfast, Ireland between March 1909 and May 1911) but there is no reason to believe that the pattern of the previous twenty plus years had changed, so it is very possible that John Roby LTD worked on sidelights, port holes and other fittings which were destined for the Titanic, or one of its sister ships, the Olympic and the Britannic.

In 1928 the two foundries reached an agreement whereby John Roby Ltd would receive first refusal on all orders of ships' lights. Then, in 1931, Utley was brought to the brink of bankruptcy when work on the Queen Mary was suspended. So, John Roby LTD bought some of the machinery from their Tuebrook site along with the name "Thomas Utley" and in 1934 Thomas Utley (Rainhill) LTD was founded and the sale of Utley products under license resumed at the Rainhill Foundry of John Roby LTD. The two companies eventually merged during the harsh trading conditions for shipping companies in 1966 and the company closed the Rainhill site in 1973. The TM Utley Foundry continues operations in St Helens today. Without any firm evidence, I am unable to date my porthole, except that it was probably made between 1880 and 1960, most likely sometime in the middle of that period (1910-30ish?).

So, leaving the porthole I moved on to the tabletop. What should it be? I found a company in Iowa, The Lumber Shack, that sells live edge tree slices and trunk rounds. I searched their inventory frequently for something I thought might work, using pictures of different rounds that I thought had a lot of character, overlaying them with the porthole and trying to find a good match.


I finally settled on some black walnut slices from a 100-year-old tree that had come down in someone's yard in Iowa. I thought the size and age matched the porthole well. The Lumber Shack had 8 to 10 slices from this same tree so I compared them all until I finally decided on one of the larger slices. It had a lot of character with its undulating edges. It also had a crack in the middle but that was fine since I was going to cut the middle out anyway. Not being skilled at working with such a delicate piece of lumber, I had The Lumber Shack de-bark the edge, epoxy the whole round and cut out the circle in the middle.
I moved to designing the base for the table. It had to be strong enough to hold up the 100-pound porthole, the 60-pound tree round and the glass plate I was planning to add to the top. It also needed to be able to roll around so it could be moved in the room and be able to be dismantled so the table could be moved into the house. My wife was not sure she wanted this in the house. I knew she would love it when it was complete but she just didn't have my vision for the piece yet!

I created a rough design with a steel round the diameter of the porthole that was about a foot tall. The porthole would fit into this round, creating a storage space in the middle. On this would be attached a plate to hold the tree round where the porthole would bolt into the tree section. Finally, I added several round plates to the outside of the steel round to create a soft look when viewing the table from the side. I provided my drawings to a local steel fabricator, Fabco Steel, and they created a proper CAD design and made the metal pieces I requested.
So, now I had all of the raw materials in the works and I just had to finish them and assemble. Hah! The work had just begun!

I have done some woodworking in the past but I was not prepared for what was to come. But luckily, I had a friend, Scott, who was a master woodworker, and he had a shop full of tools to help me. We first tackled the legs, using an old 1" by 12" section of what appeared to be walnut I had found stuffed away in my garage. We sliced it into 3" wide sections and formed a cross that would be the base for the steel drum, the legs of the cross fitting into slots cut in the drum. Little did I know how much went into the making of what seemed to be a simple cross! Each leg was three walnut sections, glued together. The gluing required a plethora of clamps to hold the boards in place while the glue dried. We spent over a week just gluing the different sections together but, in the end, came up with exactly what we needed to be the legs for the table. As Scott said, you can't ever have too many clamps!
After all was glued and done, we sanded the boards to a smooth sheen and finished them with Total Boat epoxy, giving them several coats. They looked great and I was excited to get going on the trunk slice. But it was not ready for me.
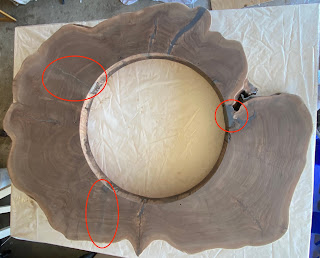
The tree trunk slab arrived on a pallet, inside a custom box completely sealed with screws. Upon opening the box, the tree slab was found surrounded with thin layers of Styrofoam for protection. Removing these revealed the slab, broken into three pieces. I had expected that there might be one break as the spot where the trunk folded in on itself was partially cut away when the circle was cut from the center of the slab. But there were two other breaks such that the slab was broken into three parts, with each section equal to about one-third of the circle.

Well, even though this was unexpected, I thought "we should be able to glue this together with some epoxy." Scott and I, with our clamps in hand, worked to figure out a way to hold the pieces together as we painted a coat of epoxy between the first two pieces. Once these glued and dried completely, a couple of days, we added the third piece and before we knew it, the circle was complete again. Surprisingly, the glue job came out very clean and we were impressed with our work.
Now that the base, legs, table top and porthole were all there, we did a sample fit - and it all went together as planned! So, we knew that the table was going to go together and what was yet to do would get us there. Remaining work was to polish the porthole, sand and epoxy the tree ring, touch up the steelwork and assemble. Yeah, that's all. But it would take another month or two to get that all done.
So, the first thing to do was epoxy the trunk and, as suggested by Scott, to add a supporting piece of plywood under the ring to give the tabletop an extra measure of strength. So, I cut a shaped piece of 1/4" plywood to fit the bottom of the tree trunk and sanded the bottom and the plywood with several different grits of paper in succession - 60, 120, 220, 320, 400 and 600 grit. I then applied epoxy on each and using screws, connected the plywood to the tree.
After applying several coats of epoxy, with more sanding in between, I called the bottom done and turned the trunk over and was ready to start work on the top. This is where another problem reared its ugly head. Once epoxied, the wood turns very dark and no grain is visible, a most unappealing and unwanted result. This was ok on the bottom but certainly NOT what was required on the table top.
I thought, oh no how am I going to lighten the wood to bring out the grain? I did some research (the Internet is not all bad!) and found that I could bleach the wood with a mixture of Lye (NaOH 8%) and Hydrogen Peroxide (H
2O
2 27%) in equal parts. It was easier said than done to find these ingredients but once I found them, I was good to go. I applied this to the table top 3 times with sanding in between each application (remember the 6 progressive grades of sandpaper used each time) to lighten the wood to what I hoped would be the perfect shade after I coated the slab with 4 coats of the epoxy.
Now I proceeded to sand, then epoxy, then sand, and then epoxy until I had four coats. The sandings each took a day, remember the 6 grit levels each time. Then the epoxy coats each took two days as I could brush on the coat but needed to wait two days for it to dry completely, at least that is how I did it. I also did not work on it every day so in total it took about two weeks to finish the four coats. Finally, I had to buff it to the desired finish after the last coat.
Now that all the different parts were ready, I was finally able to assemble the table. The legs bolted onto the drum which supported the table top. The porthole required the installation of 19 threaded inserts for the brass bolts that anchored the porthole base to the table. All this took a few days as well since I needed to screw the table top to the steel drum, add the connections for power for the lights inside and for the USB charger ports.
Once the table was all put together (except for the porthole window, it was added after as it was very heavy) I asked my youngest son to come over and help me bring it inside as there was no way I could do it by myself. We wheeled it to the front door, lifted it over the threshold and down into the family room and rolled it into place. Once it was inside and all set up, Cathy said she loved it there so it is now the center of attention in front of the fireplace.
I am not sure if I will do anything like it again but I get excited every time I come into the room and see it glowing lightly (added some LEDs inside that glow out the frosted window of the porthole and through the bottom of the drum). Or when someone new comes by and sees it for the first time, I appreciate their kind words of praise for how beautiful it turned out. So, no matter what I do in the future, I suspect that this will be my
Magnum Opus.


No comments:
Post a Comment